|
FOX 15 BAFFLE PISTON OWNER'S MANUAL |
|
|
|
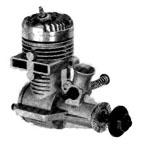
MOUNTING Your Fox 15 should be mounted using a firewall type aluminum mount such as Fox part number 50201, or hardwood beam motor mounts, not balsa wood. Firmly attach using 3-56 or 4-48 screws. The mount in turn should be securely fastened to the plane so it will absorb the vibrations without coming loose. FUEL TANK A good engine run is completely dependent upon a good tank installation. For control line models the tank should be firmly directly in back of the motor and with the center line of the tank directly in line with the needle valve. The tank outlet should be connected to the needle valve body by means of flexible fuel tubing. Both these items are available in the Fox product line. RECOMMENDED FUEL, PLUG AND PROPELLER The Fox 15 runs best on our Missile Mist fuel. Lower priced fuel in many cases does work satisfactorily, but for the highest power output, steadiest run, and easiest starting, we recommend Missile Mist fuel. The propeller to use is 8" diameter 4" pitch. The Fox 15 uses a Fox standard short glow plug. |
|
WARNING Always keep clear of the propeller. It is possible for a propeller to cut a finger off, or for a piece to come off and put an eye out. |
|
WARNING Model airplane fuel is both flammable and extremely poisonous. Use the same safety precautions that you would with a can of gasoline or a bottle of poison. |
|
BREAK IN Your Fox 15 may be difficult to start at first. This will improve with further running. So do not be disappointed but be patient until you have run a few tanks of fuel through the motor. STARTING THE MOTOR 1. Set the model level and fill the tank. NEEDLE VALVE ADJUSTMENT A model airplane motor, unlike an automobile motor, has no throttle. Speed is reduced by giving the motor too much fuel. A motor with too much fuel will run slower, and miss every other revolution. This is called 4-cycling. It is much easier to run with the motor in this condition, than it is to run with too little fuel. The needle valve should be adjusted to the richest position which will give you sufficient power for the flight and still keep running. GLOW PLUG Ignition occurs automatically when the piston brings the fuel mixture upon compression and it is subjected to a red hot platinum coil. This platinum coil is extremely fragile and will often burn out or be broken by particles of dust that go through the motor. It is impractical to guarantee these coils and you should consider replacement occasionally to be a standards part of your operating expense. |
|
WARNING There is always the possibility you may lose control of your model. Do not fly in any location where your model might strike people or do property damage should this occur. |
|
WARNING Never fly a control line model within 200 feet of power lines. Death by electrocution is possible if your model comes near power lines. Direct contact is not necessary. |
|
WARNING A model airplane motor can get hot enough to cause a serious burn. Do not touch the motor right after it has been running. |
|
IN CASE OF A CRACK-UP From time to time you will undoubtedly have some crash landings. Whenever this occurs, do not attempt to turn the motor over until it has been cleaned. DISASSEMBLY AND CLEANING 1. Remove the motor from the airplane. TO REASSEMBLE Reverse the procedure above using care to not cross-thread
the parts. Replace gaskets for best results. Piston should have
baffle on the bypass side of the case. Turn motor over before
tightening screws. It should be free. Check again after screws
are tightened. If motor binds any noticeable amount, loosen,
shift parts slightly, then try again. FACTORY SERVICE In the event you are unable to make a satisfactory repair, we recommend you package up the motor and send it to us at 5305 Towson Avenue, Fort Smith, Arkansas 72901. We do not make estimates, but do assure you that no repair, exclusive of shipping charges, will exceed one-half the price of a new motor. |